Summary
- Obsidian charges $5/month for cross-device syncing, but you can sync for free using apps like Autosync or Syncthing.
- Autosync is ad-supported and requires using third-party storage services. Syncthing is free, has no ads, and is an open-source alternative without third-party involvement.
- Setting up Syncthing involves installing it on your PC and phone, connecting the devices, and setting up a synced folder for your Obsidian vaults.
Obsidian is a powerful note-taking app that I love, but it charges $5 a month for the ability to sync between your devices. If, like me, you feel that’s a bit too much, here’s a guide on syncing your Obsidian notes between your phone and PC for free.
Your Options for Syncing Obsidian Between Devices
When you use Obsidian, you need to create a vault—a fancy term for a folder. This folder contains all your Obsidian notes as MD or markdown files. This means that if you can create a system to sync the Obsidian vaults on your phone and PC, your Obsidian notes are also synced.
The official way to get the sync feature to pay $5/month (or $4/month with annual billing) for Obsidian Sync. It works seamlessly, but the main issue is that it’s a paid solution.
Another solution is that you store your Obsidian vault in Google Drive. You can technically do that on your PC by installing Google Drive, creating a folder inside of Google Drive, and using that as a vault. However, the Obsidian app on your phone can’t use a Google Drive folder to create a vault. You can get around this issue by using an app like Autosync for Google Drive, but again, it’s not an ideal solution.
The benefit of using Autosync is that it’s simple to use. However, it’s ad-supported and requires a small one-time fee to remove the ads and unlock more premium features. But the bigger problem is that you have to share your notes with a third-party vendor, which I feel takes away from one of the main benefits of using Obsidian: ownership of your notes.
This is where Syncthing comes in! It’s a completely free and open source (FOSS) app that allows you to sync folders between your devices without any third-party involvement. Data is synced directly between your PC and phone, or any other device. The only drawback is that it can be a bit complicated to set up.
Fortunately, I’ve prepared a detailed step-by-step guide on using Syncthing to sync your Obsidian notes.
How to Use Syncthing to Sync Your Obsidian Notes
Before we start, I strongly recommend that you backup your Obsidian vault(s), whether it be on your PC or phone or both. Syncing can be a tricky game, and deleting a folder or note in one place will result in getting it deleted in the other place.
Also, don’t use multiple sync methods. If your current Obsidian vault is in the cloud, like Google Drive, don’t connect it with Syncthing. Make a copy of it in your local storage and connect it with that. The same file or folder connected to multiple syncing methods is a recipe for disaster. It can corrupt your files or create an endless sync loop.
Now, with all the disclaimers out of the way, let’s set up Syncthing and start syncing your Obsidian notes.
Step 1: Install Syncthing
You need to install Syncthing on both your phone and PC for this to work. On your PC, visit the Syncthing website and go to the Downloads tab.
There are various download links. Those under “Base Syncthing” are for the command line and web-based experience, whereby closing the terminal also stops syncing. I personally don’t find this convenient.
Instead, I use and recommend the apps within the “Integrations” section. These are apps designed to suit your operating system, with features like file browser integration and system tray icons. Both links take you to GitHub to download the app.
I am using the Syncthing Windows version for this tutorial. But all the steps and overall app user interface are the same for the macOS app as well.
Once downloaded, simply run the installer and follow the installation wizard. During the installation process, you should see a page which lets you configure the port and address. If you’re unsure, keep the default settings.
Also, check “Start Syncthing Automatically When Logging On” and “Start Syncthing After Installation” on the installation wizard.
Once the installation is complete, open your browser and enter this into the address bar: http://127.0.0.1:8384/
Alternatively, if you tweaked the port and address, then enter this: http://address:port/
This opens the graphical user interface for Syncthing to manage and configure your devices, which folders to sync, and so on.
I’ll touch on how to do all of this in the following sections. For now, let’s install Syncthing on your phone. If you have an Android device, download Syncthing-Fork. iPhone users can get Mobius Sync, though if you’re willing I recommend paying for Mobius Sync Pro as it contains some crucial features.
Once installed, open the app, and it will ask you for a few permissions. Allow notifications, local storage, and battery optimization. Also, if your phone is not connected to a Wi-Fi network, you’ll get a warning stating “Syncthing Is Disabled.” To fix this, you can either enable Wi-Fi, or hit the hamburger icon in the top-left corner, go to Settings > Run Conditions and enable “Run On Mobile Data.”
For the sake of this guide, I’ll be using the Android app. Both apps for Android and iPhone are built using the same Syncthing base and offer similar experience in terms of interface and functionality.
Step 2: Connect Your PC With Your Phone
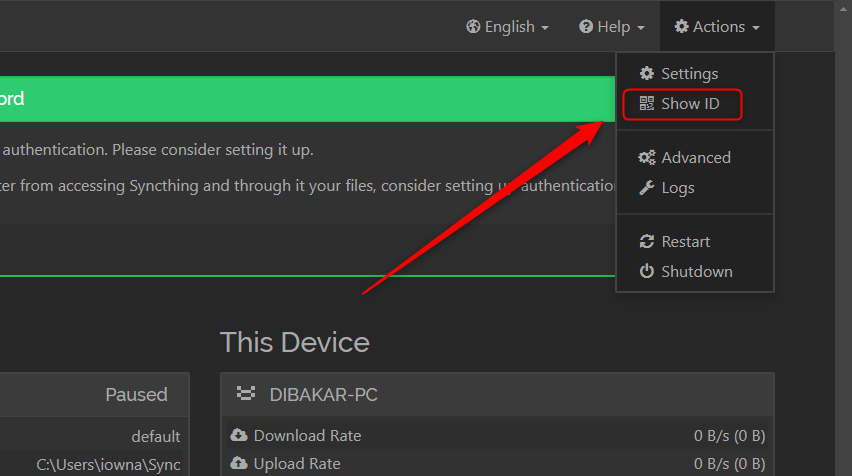
Open the Syncthing web interface on your PC and click on Actions > Show ID from the top menu. This shows you the ID that you need to enter into your phone’s Syncthing app.
Next, open the Syncthing app on your phone, switch to the “Devices” tab, and tap the “Add Device” icon in the top-right corner. This will open a form where you need to enter the Syncthing ID from your PC and also add a name to help you easily identify the device.
After entering the details, select the checkmark in the top-right corner. Now visit the web interface on your PC and you should see a new request from the mobile app. Click “Add Device,” give the device a name, and click Save.
That’s it—Syncthing on your PC and phone are now connected. You can check whether the connection is stable and working by visiting either of the apps. On the web interface, you get a Remote Device section which shows all the devices connected to your PC. Similarly, on the mobile app, you can see all connected devices under the Devices tab.
Now, with the Syncthing connection established, it’s time to create a shared folder.
Step 3: Set Up a Folder to Sync Obsidian Vaults
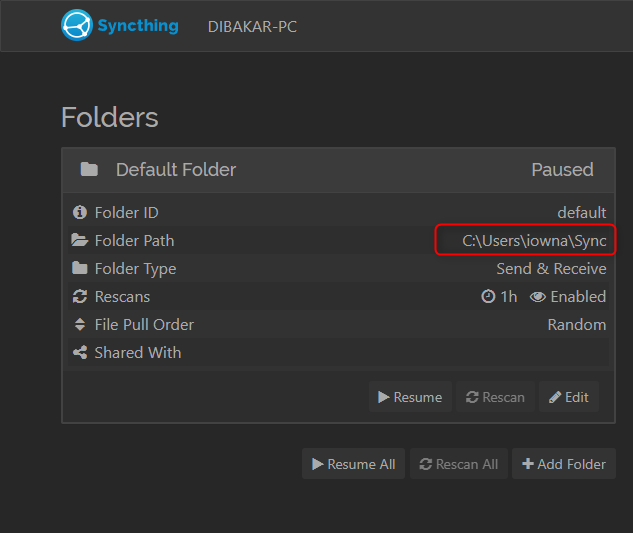
Open the Syncthing web interface on your PC and you should see there’s a Default Folder called Sync already created under the Folder section.
The folder is paused (not syncing) by default. You can move your Obsidian vault to this folder and enable syncing. Alternatively, you can pick your existing Obsidian vault folder and sync that—which is what I’ll be doing in this guide.
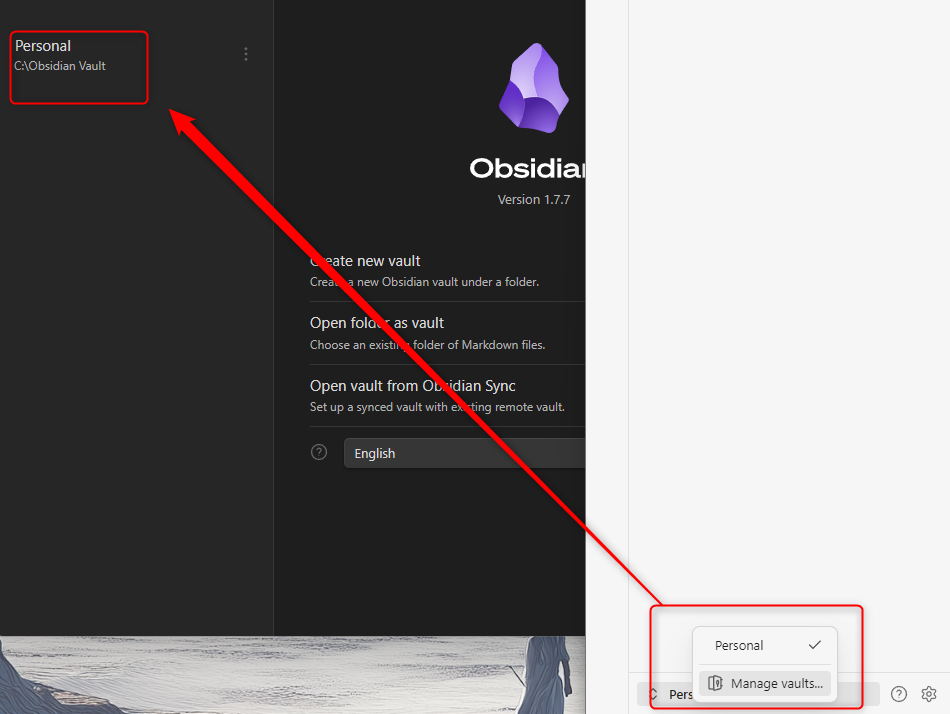
To start, open Obsidian on your PC. Then, from the left-hand sidebar, click on your vault name at the bottom. Finally, click “Manage Vaults” to open the Obsidian vault switcher. From here you’ll get the path to your Obsidian vault. For me, it’s “C:\Obsidian Vault\Personal”.
Now, open the Obsidian web interface and click “+Add Folder.” Keep the Folder ID as is, no need to change it. You can add a Folder Label (not the same as folder name) for quick identification. For the Folder Path, paste the path to your Obsidian vault on your PC. Next, jump into the Sharing tab and enable syncing this folder to your phone.
Once you do this, you should get a notification on your phone telling you that Syncthing on your PC wants to share a folder with you. Tap “Accept.” This opens the Syncthing-Fork app on your phone and prompts you to create a new folder.
Tap “Directory” (not the cog wheel) to choose which folder on your phone you want to sync with the Obsidian vault on your PC. I strongly recommend creating a new folder for this purpose. After creating a folder and adding its path to the directory, tap the checkmark in the top-right corner, and you’re done.
If you already have an Obsidian vault on your phone, do not choose it as the sync folder with the one on your PC. It’s likely that both vaults contain different notes, since both were independently created. If you sync these two folders, then files might get corrupted.
And there you have it—Obsidian on your phone and PC are now connected. Everything you do on the Obsidian app on your phone will reflect on the PC app and vice versa.
Be aware, it takes around five to ten seconds for the sync to initiate. I recommend that you don’t simultaneously work on the same note from your PC and phone, as that might cause issues with the syncing and lead to file corruption.


