
Resizing images in macOS is easily done in the Preview app, but if your daily workflow requires you to scale images to a specific size – for uploading to a blog, for example – then using an image resize Quick Action is a much faster way of getting the job done.

In this article, we’ll show you how to use the Automator app to create a simple Quick Action that, once saved, will have you resizing images in just a couple of clicks, without even going near an image editing app. Keep reading to learn how it’s done.
Create a Resize Image Quick Action
- Launch Automator from the Applications folder.

- Click New Document, then choose Quick Action as the type of your document.

- Select Files and Folders in the Actions sidebar, then drag Get Specified Finder Items to the workflow area.
- Click the Workflow received current dropdown at the top and select image files from the menu.

- Select Photos in the Actions sidebar, then drag Scale Images to the workflow area.

- Automator will prompt you to add a Copy Finder Items Action to save the original files in a separate folder. We’re sticking to a simple workflow of resizing images here, so we click Don’t Add.

- In the Scale Images action panel, type the width that you want to resize your images to. We’re going to use 1200 pixels.

- In the Automator menu bar, select File ➝ Save…, call your new Quick Action “Resize Image”, then click Save.
Use Your New Quick Action
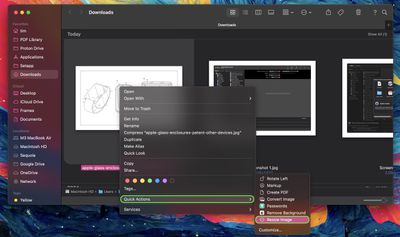
Next time you want to resize an image, simply right-click (or Ctrl-click) the item in Finder and select Quick Actions ➝ Resize Image from the contextual dropdown menu. You can also drag a selection box over several images and resize them all in one go using the Quick Action.
Add a Keyboard Shortcut
Why not assign a key shortcut to your image resize Quick Action to speed up the process? To do so, launch System Settings, select Keyboard in the sidebar, then click the Keyboard Shortcuts… button.
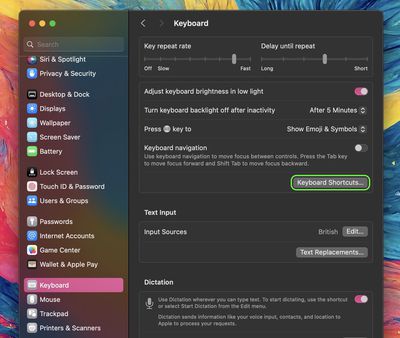
Select Services from the sidebar, expand the “Pictures” checklist, and you should find Resize Image near the bottom of the list. Double-click the line item where it says “none”, then enter your custom key combination. Click Done when you’re finished.

By integrating this Quick Action into your macOS workflow, you should be able to efficiently resize images with just a few clicks, saving you time and enhancing your productivity.