A letterhead is a collection of text, images, and colors at the top of a letter that contains various details about who you are as a sender. In Microsoft Word, you can either create these using templates or start from scratch, and—most importantly—save your finalized design for repeated use.
Any time you’re working on a Word Document, it’s handy to
turn on Show/Hide
by clicking “¶” in the Home tab to see more clearly how the document is laid out.
Why Are Letterheads Beneficial?
Letterheads are more than mere fancy designs at the top of a piece of paper. In fact, they have many benefits. Although mostly used in business-related correspondence, anyone can add a letterhead to their outgoing mail. For example, I use a pre-designed letterhead on my job application cover letters. Here’s why:
- Letterheads give a good first impression: Much like interviewers making split-second judgments when a candidate first enters the room, someone opening a letter will notice its layout straightaway, so adding a swanky letterhead will get you off to a good start, whatever your reason for writing.
- They establish and project an identity: This is true whether we’re talking about brand identity or individual identity. Letterheads can contain your name, position, qualifications, and even a photo, meaning the recipient already knows who you are before they’ve even started reading your letter.
- Headed letters appear more credible: Letterheads look more professional, trustworthy, and authoritative than a plain, white document.
- Letterheads promote the brand: In a more corporate setting, letterheads donning the company’s logo, fonts, and color scheme emphasize the brand.
- They make your letter more easily identifiable: Your headed letter will stand out from the crowd when someone is flicking through a large pile of mail.
How to Use a Word Template to Create a Letterhead
Word has many templates you can choose from to create your letterhead, and it’s best to begin with a new Word document. Although you can apply a template to an existing document through File > Options > Add-Ins > Templates, this tends not to work exactly as you would hope.
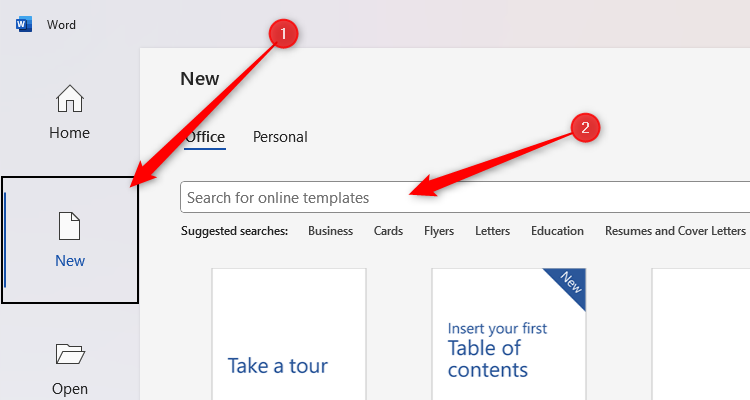
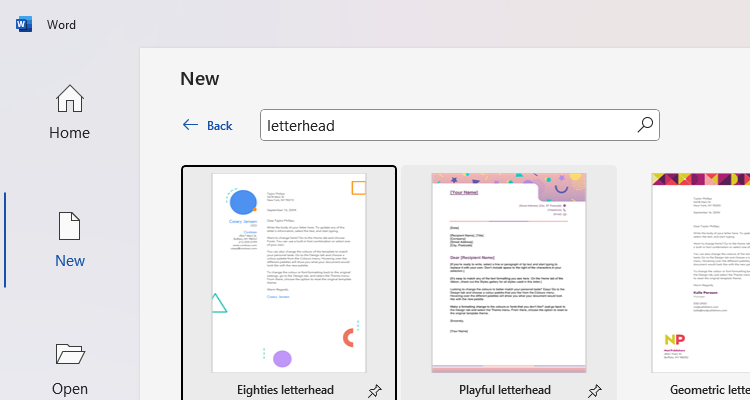
Once you have opened Word, click “New,” and then type letter or letterhead into the search box.
Single-clicking one of the results will show you an enlarged version (and you can then click “Create” if you’re happy), while double-clicking will instantly download and create the template for you.
The template will then load, ready for you to adapt as necessary.
Benefits of Using a Template Letterhead
- Since they’re ready-made, and you only need to add a few personalized touches, Word’s letterhead templates are a true time-saver.
- Most of Word’s template letterheads are well-designed and look great.
- There are a wide range of templates available, varying from very professional to casual.
Drawbacks of Using a Template Letterhead
- If you struggle to find a template that perfectly aligns with your ideals, you’ll probably spend as much time amending it as creating one from scratch.
- Word’s letter templates use text boxes, placeholders, shapes, tables, different typefaces, and different font sizes, and they’re not always the easiest to shuffle and reformat.
- Most of Word’s templates include other elements, such as a footer design, a colored banner on each page, and seemingly random shapes in random places, so it’s worth bearing these in mind if you’re looking to add only a letterhead.
- Although the chances are minimal, the person reading your letter might recognize your design as a Word template, which could instantly reduce your credibility.
How to Create a Letterhead From Scratch
The letterhead will go in the header of the first page, so before you start designing your content, make sure your page is correctly set up.
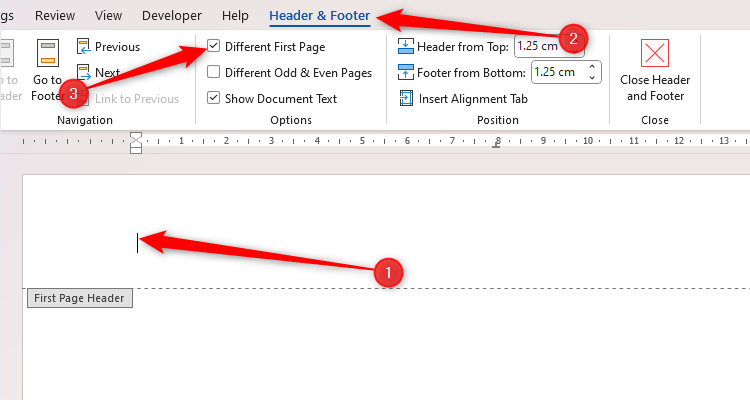
First, double-click anywhere in the header section at the top of page 1, and check “Different First Page” in the Header And Footer tab on the ribbon. This will ensure your letterhead is on the first page only.
Next, you need to adjust the margins, so that you can use the full width of the page. With the header still activated, drag the horizontal tabs on the ruler to the sides of the page, and move the upper boundary upwards. If you can’t see the ruler, check “Ruler” in the View tab.
Adjusting the margins in the header will have no impact on the margins of the main body of your letter. It’s also worth remembering that you might lose a few millimeters from the top and sides of your
document when it’s printed
, so make sure you don’t have any important details near the edge.
Next, you need to decide whether you’re going to create and format your header using a table or text boxes and shapes.
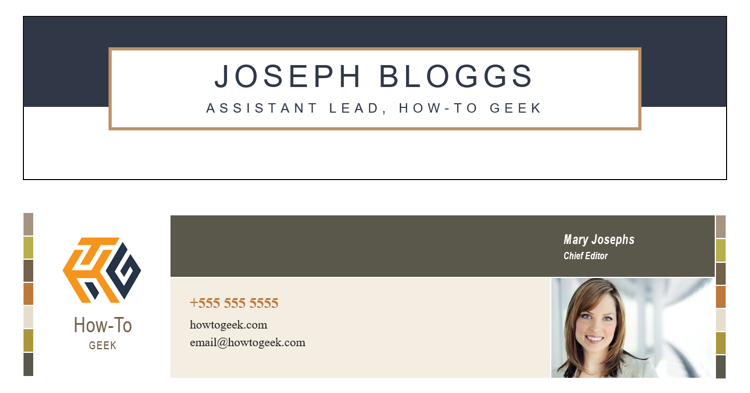
In this example, I inserted a table with three columns—one for the logo, one for the contact details, and one for the name and position. I then filled the middle and right cells in color, changed the text sizes and alignment, and adjusted the table border formatting. Tables are ideal if you want to segment your letterhead into various sections, and you’re fine with the outlines being rectangular and square.
For this next example, I searched Word’s stock images for wavy (via Insert > Pictures > Stock Images), and cropped my favorite choice to fit nicely into the header. I then used text boxes with different alignments to add the text on top. This approach is ideal if you want a fancy background behind your text, but these designs might not work well if you want to add an additional image, like your photo or company logo.
Benefits of Creating Your Own Letterhead
- Providing you can get your head around the different ways to format text, tables, and images in Word (and you have a decent amount of patience!), creating letterheads from scratch gives you full flexibility and adaptability.
- It’s a good way to unleash your creativity and see what you can come up with!
- Home-made letterheads are easier to format than template ones. You made the letterhead, so there’s a good chance you know how to change it.
Drawbacks of Creating Your Own Letterhead
- Creating a design from scratch usually takes more time than when you use a template.
- Blank canvases aren’t for everyone! If your creative juices aren’t flowing, it’s probably a better idea to use a template.
How to Save Your Letterhead as a Template
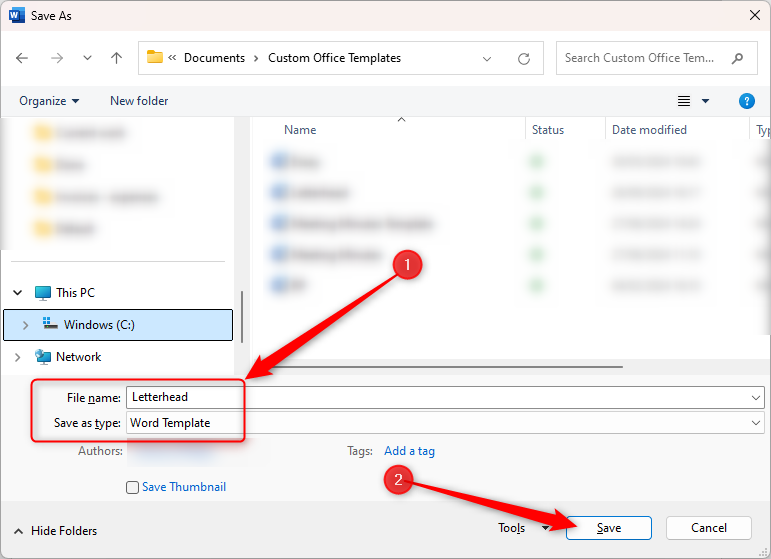
Whether you’ve used a template or created your own letterhead, once you’re happy with how it all looks, you can save it as a template so that you can reuse it in future letters.
Press F12 to open the Save As dialog box, where you should give your letterhead an appropriate File Name, and choose “Word Template” from the Save As Type drop-down menu. Then, click “OK.”
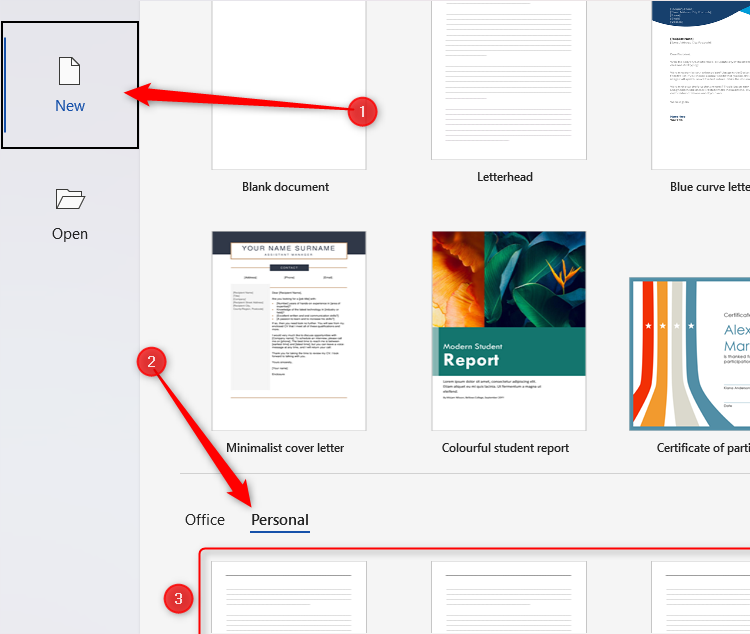
When you’re ready to start a new letter, open Word, click “New,” and switch to the “Personal” tab. There, you’ll see all the templates you have created and saved.
Once you’ve single-clicked a template to select it, Word will open a new, unsaved document, with your letterhead ready to go. The first thing to do is to name and save your new letter as a standard Word document in an appropriate place on your computer. Then, you can start writing your well-presented letter!
If you find your letter runs on for too many pages, check out our tips for dealing with lengthy Word documents. While you’re there, explore the different ways you can format the rest of your Word document, so that it matches your quality letterhead.

