Quick Links
You don’t need to keep a separate app on your phone for all your email addresses. You can just log into your Outlook, Apple Mail, or other emails on the Gmail app. Allow me to show you exactly how. It lets you manage multiple accounts from different providers for a streamlined inbox.
Adding a New Email Account to the Gmail App
To add a new non-Google account to your Gmail app, you only need its email address and the password for it. I’m using my Outlook email for this demonstration, but you can use Yahoo, iCloud, and other emails too. I failed to make Protonmail work with the Gmail app though (it’d have required a subscription).
The Easy Way
To start, just open the app and click your profile icon on the top. It should have a “Add Another Account” button. Tap it and select the email client you’re using. I’m adding an Outlook email, so I selected it on the “Set Up Email Screen.”
Selecting Outlook takes me to a Microsoft page where I sign into my Outlook account and grant Gmail access to use its data.
And that’s it! The new Outlook email should be added to your list of email accounts, and you can access it by tapping the profile icon or the “All Inboxes” button.
The Hard Way
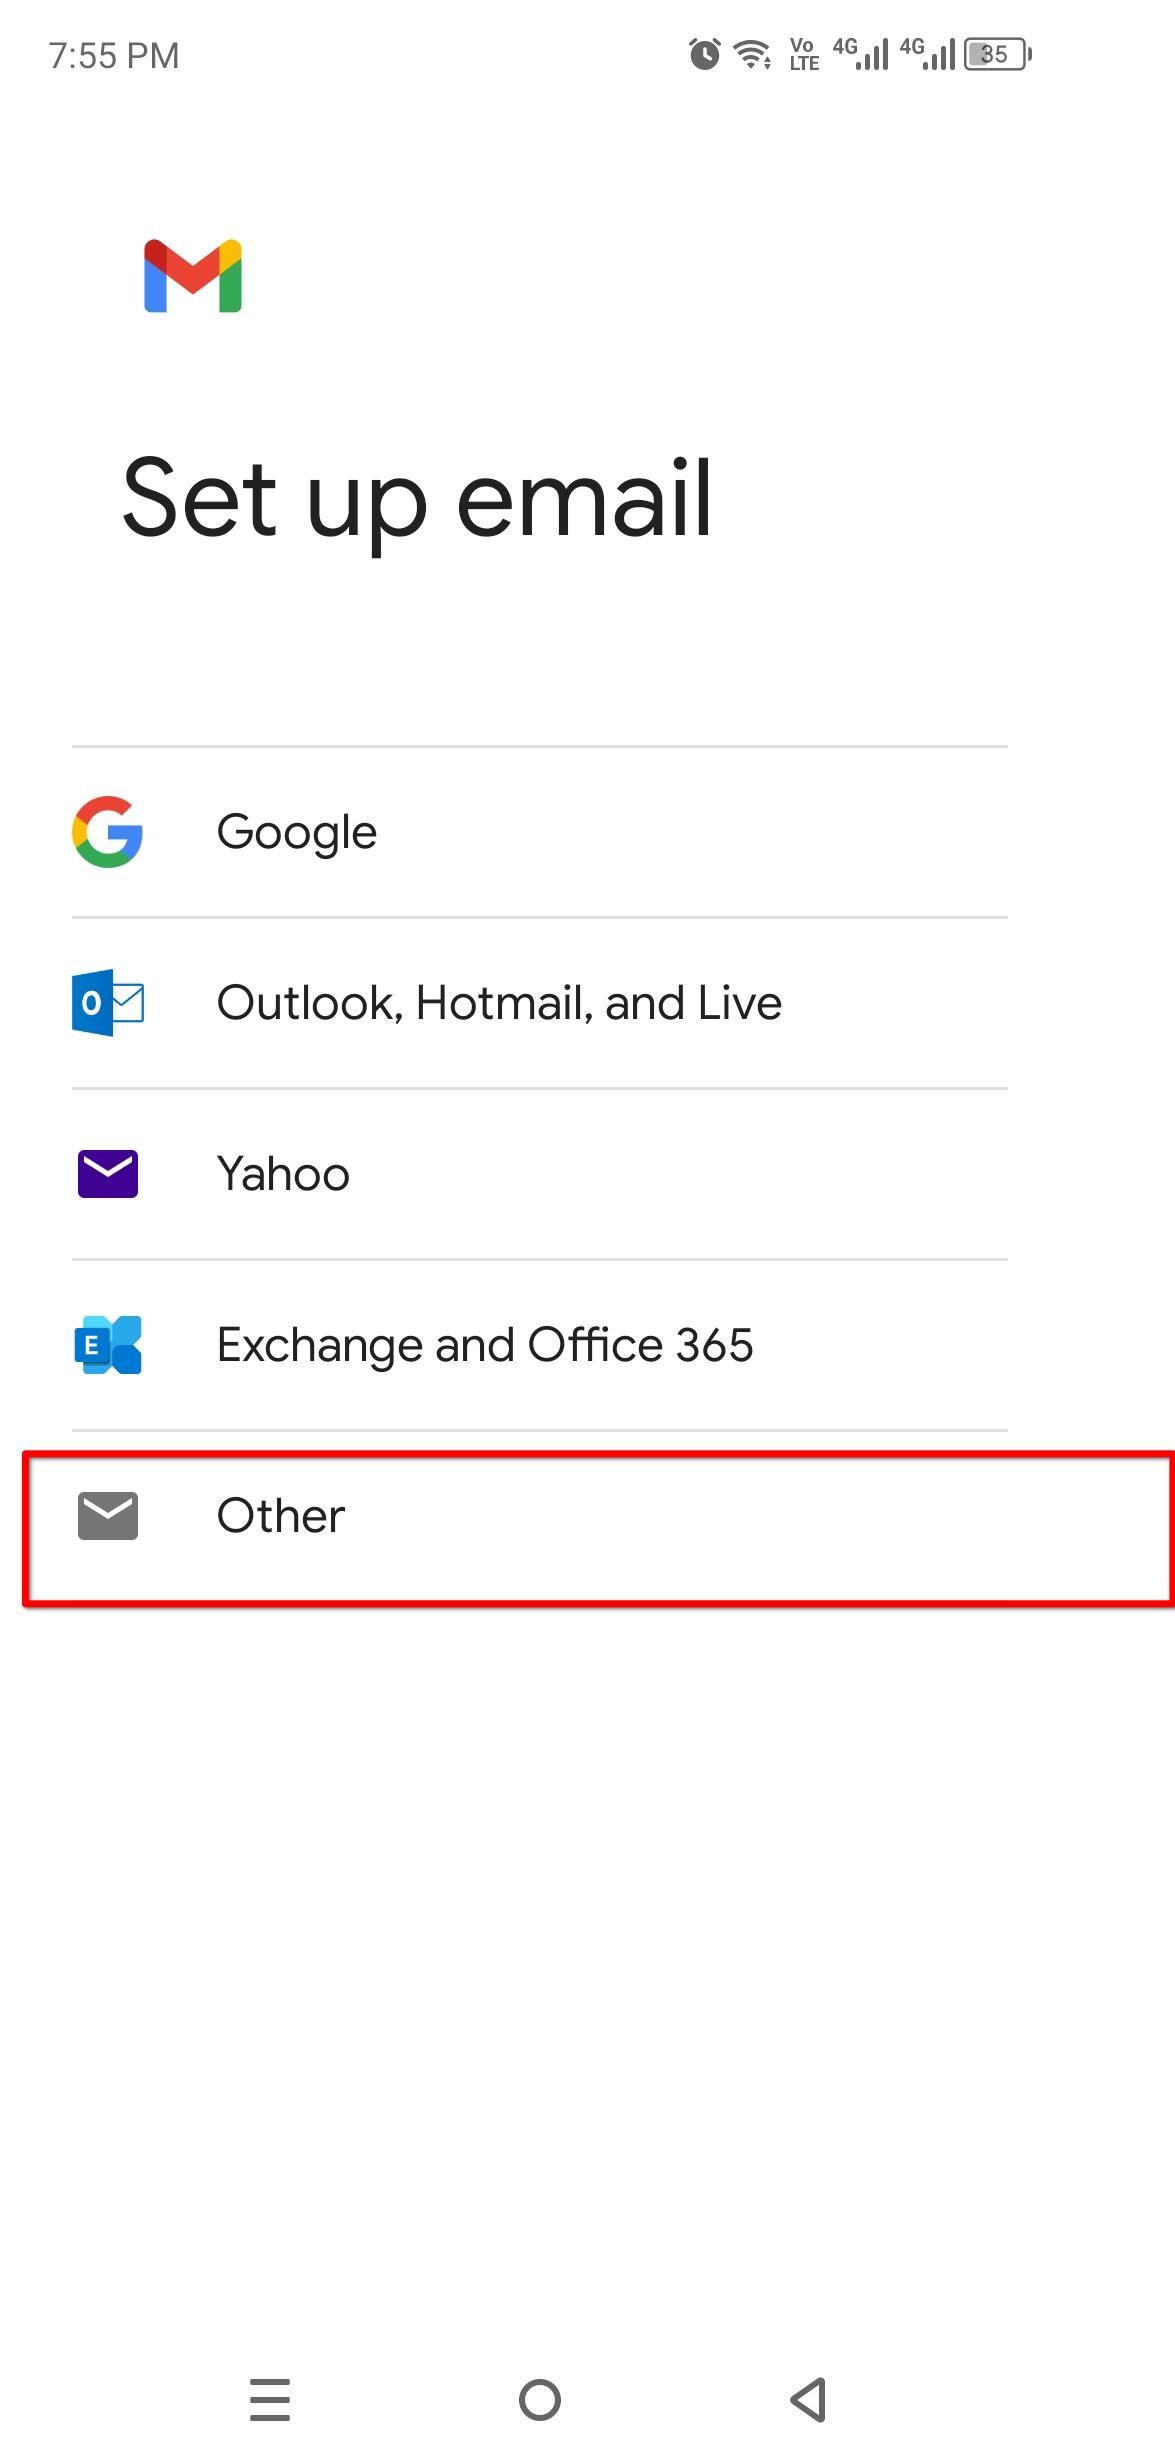
For email providers that aren’t on the list, you’ll have to select “Other” in the list and set them up manually. It can get a little confusing if you don’t know exactly what you need to do, so I’m going to walk you through every step. I’ll also leave some troubleshooting tips for you in the last section in case you need any further help.
First, we open the app, tap the profile icon, select “Add Another Account.” This time we’ll choose “Other.”
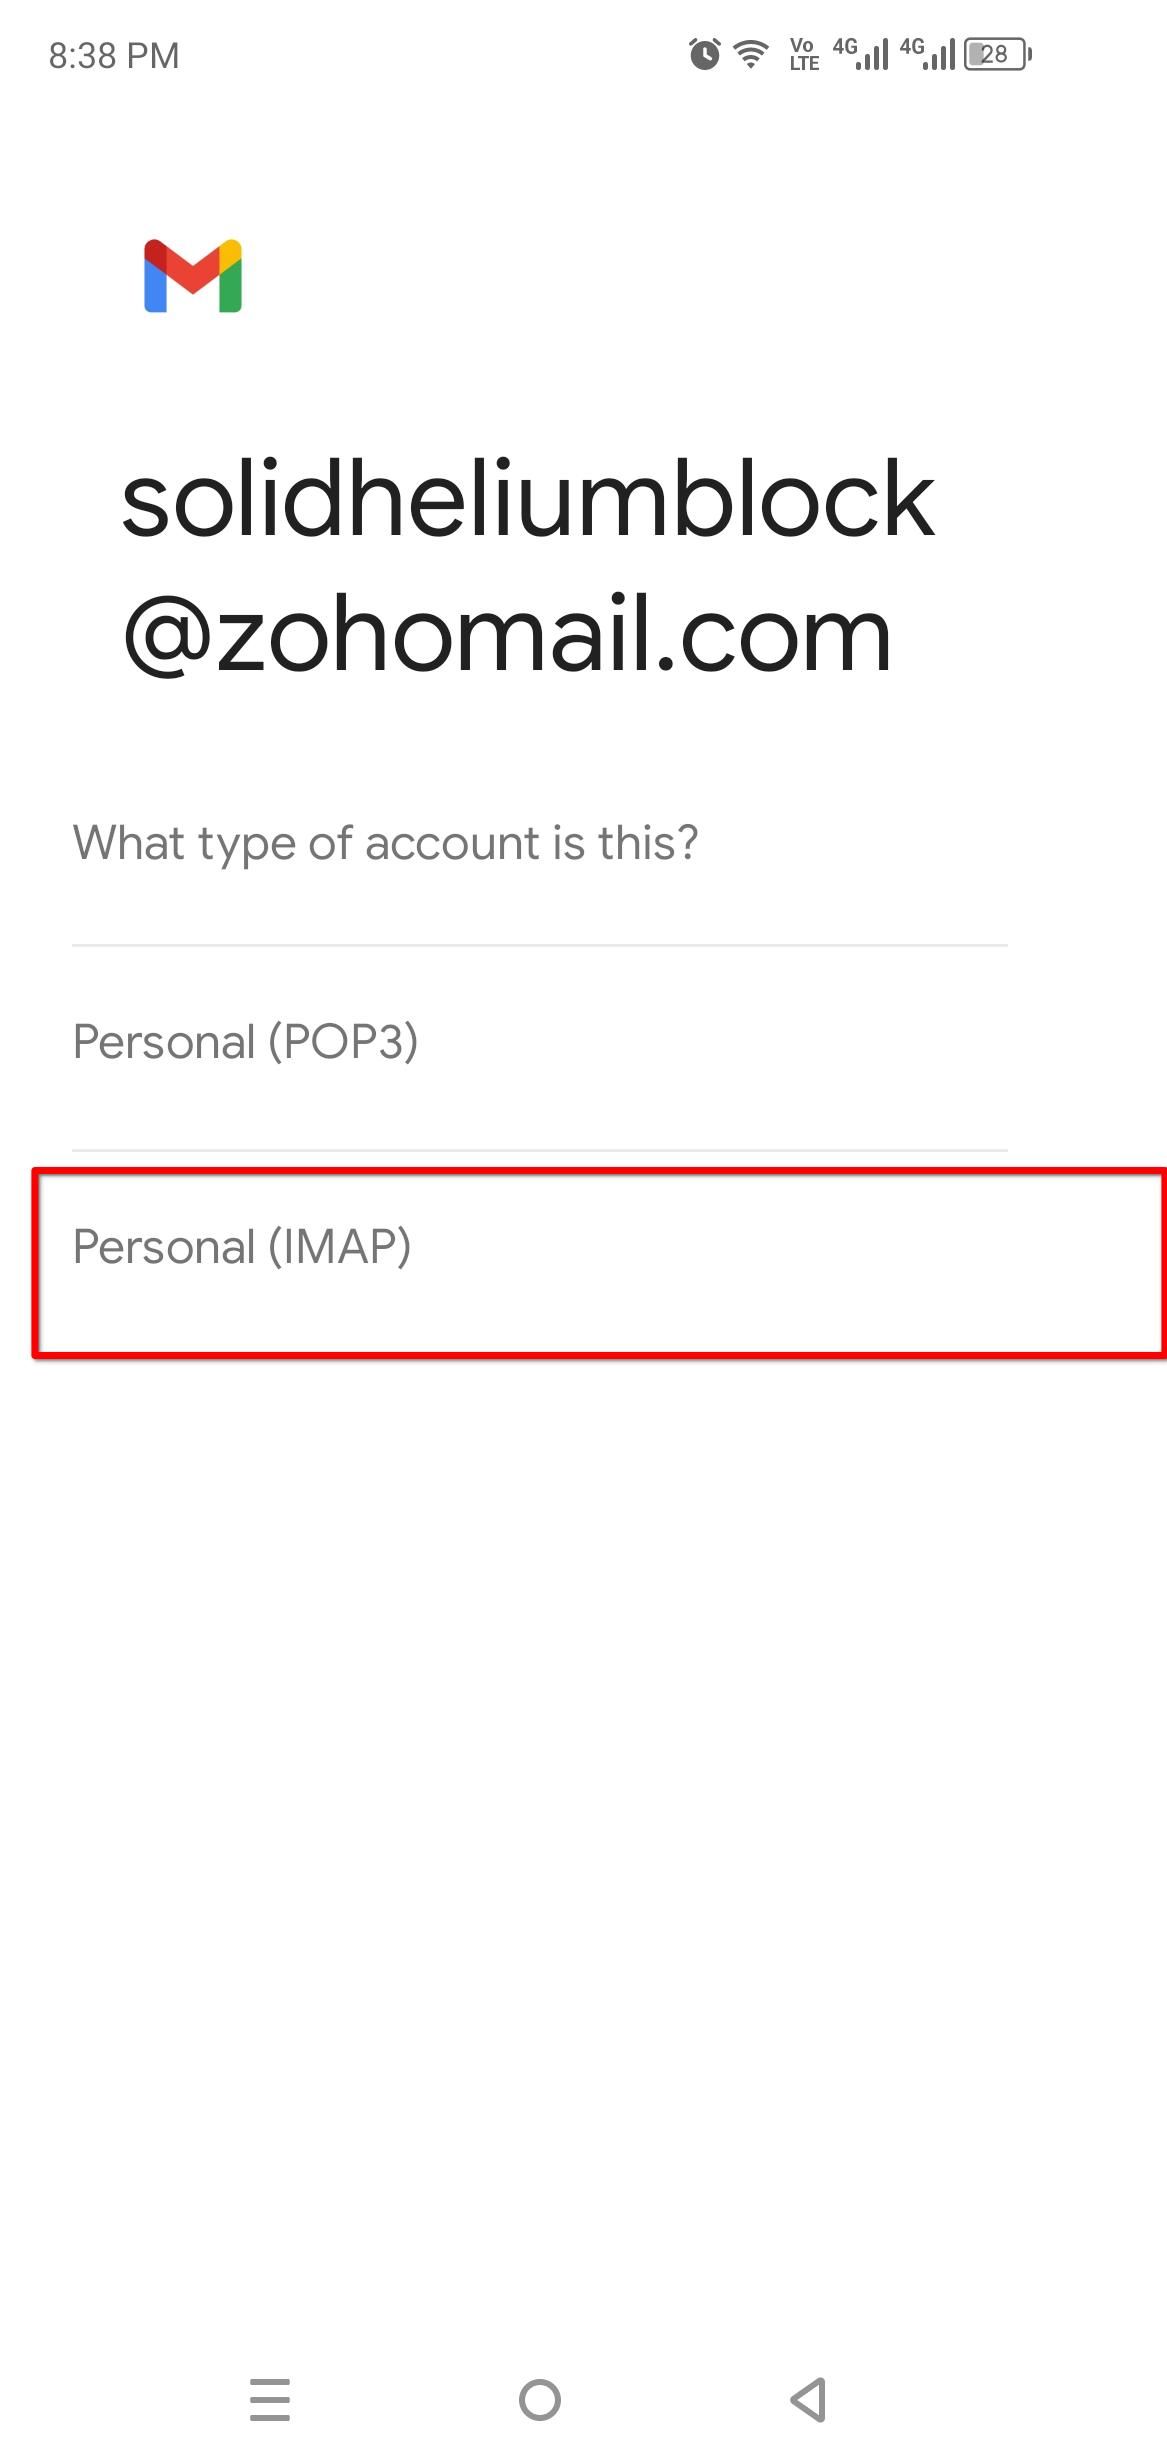
On the next screen, type the email address you want to add. I’m trying to add a Zoho Mail account, so I’ll enter that here. You can follow along with any other provider. The steps are basically the same.
Gmail will ask you if it’s a POP3 account or an IMAP account. Pick IMAP.
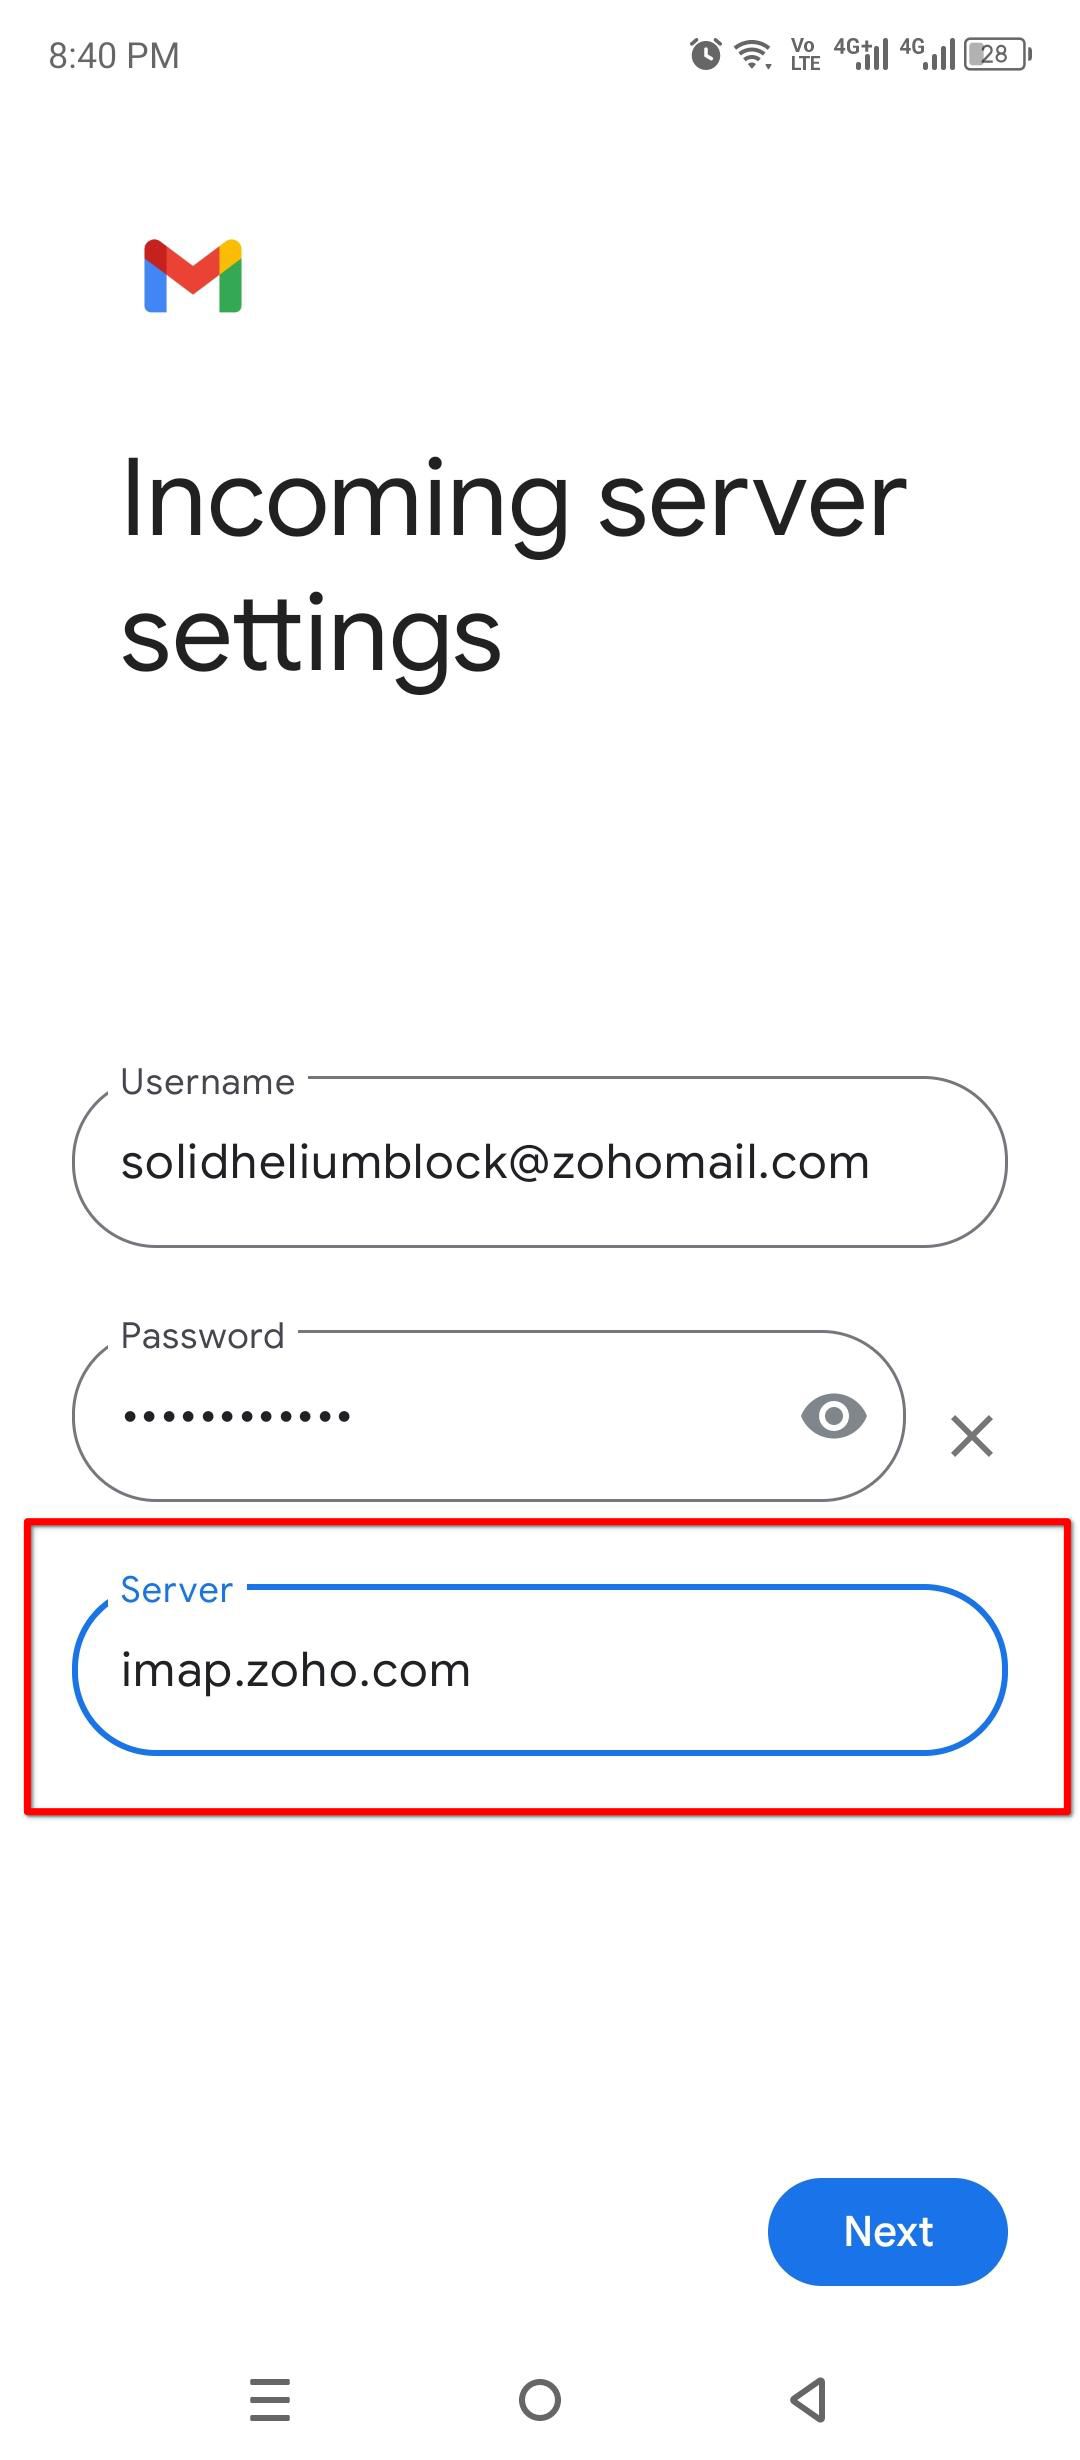
You’ll need to add the server that your provider uses here. You’ll find that info either in the settings panel of the default email client or on the support pages of your email provider. Most providers keep IMAP access disabled by default, so you’ll need to activate it first.
You don’t need to know what this stuff is, but to clarify,
POP3 and IMAP
are email protocols that let you access and manage your emails over the internet. POP3 is an old standard that copies emails directly to your computer’s storage and IMAP is more modern and syncs across devices.
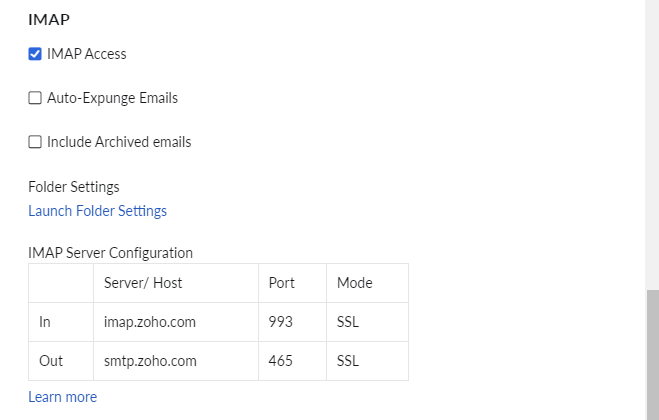
On the Zoho Mail interface, I found IMAP Access listed under “Mail Accounts.” Enable “IMAP Access” here.
The IMAP server settings were also listed on the settings page. You can find the right IMAP configuration for your provider by searching “email provider name + IMAP settings.”
Let’s get back to the phone now. Gmail shows different screens here depending on the service you’re trying to add. My Incoming Server Settings screen shows only the username, password, and server fields. The username is the Zoho email address and the password is the Zoho account password.
The server in my case is “imap.zoho.com.” You might also see port and security settings. You can copy the correct port and security mode from the configuration page too. Press next when you’re done.
A lot of services use “imap.service_name_here.com” as the default IMAP server.
You’ll land on the Outgoing Server Settings next. Here we’ll add the SMTP server that sends emails. For Zoho Mail, it’s “smtp.zoho.com.” Tap “Next” and configure the account to your liking. When you’re done, tap “Next.”
The app will restart, and your other email account should be accessible in the profile menu.
Removing the Email Account From the Gmail App
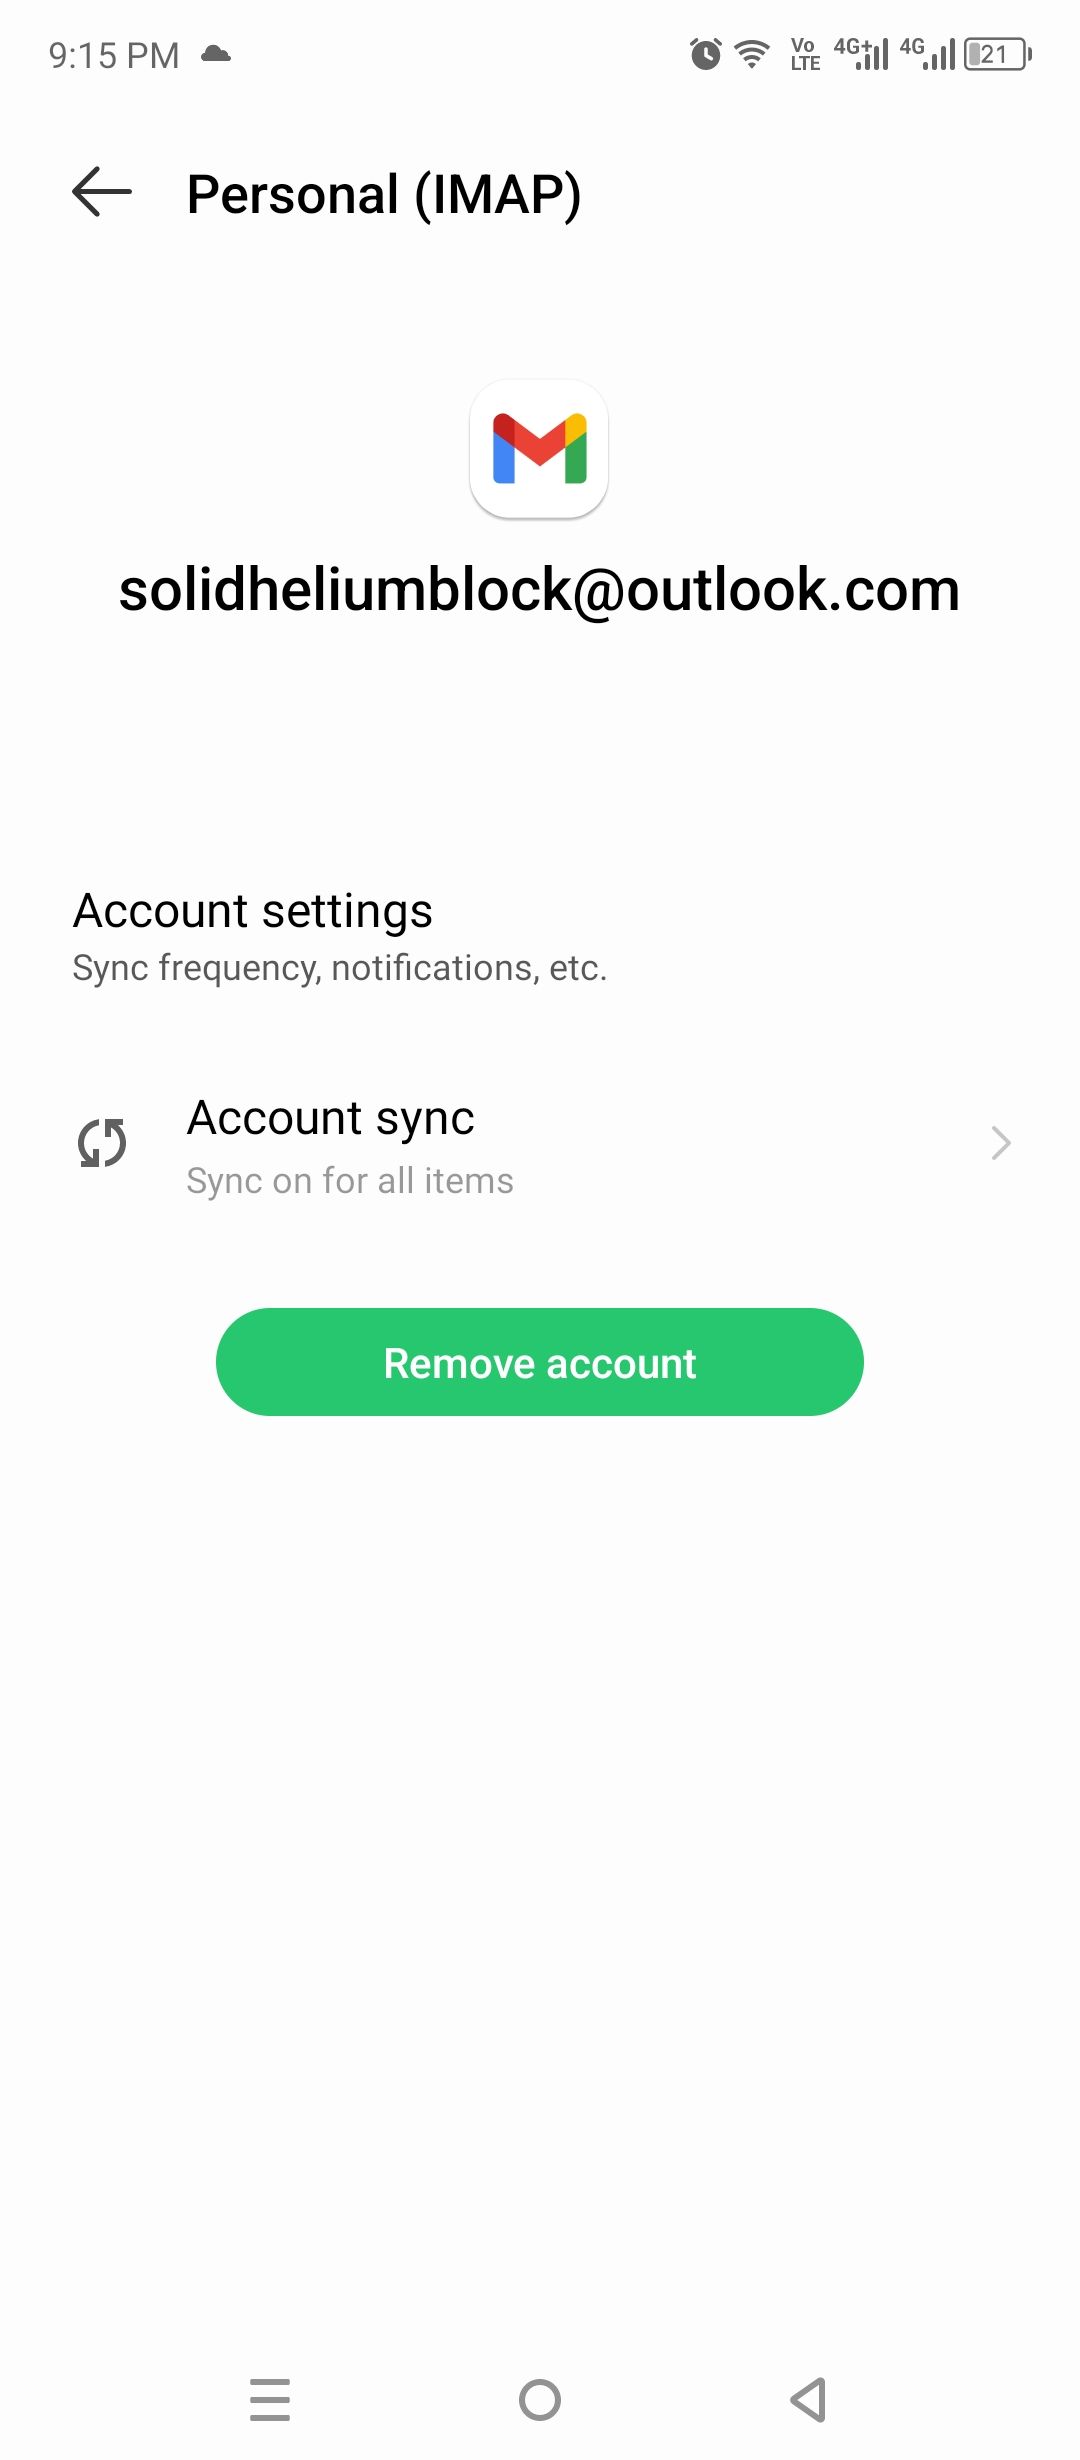
Removing an added account is a lot simpler. Tap your profile icon, select “Manage accounts on this device,” and scroll down to find the account you want to remove. You’ll also find this menu in the Settings app.
Tap the account you wish to remove and tap “Remove Account.” Confirm the action, and you’re done!
Some Pro Tips
If you’re using one of the listed email providers, the setup should be effortless. Do keep in mind that you’re limited to 5 non-Google email accounts at a time. If you want to make space for more, you’ll have to remove an existing account. You’ll get the same features that you get with your Google account because Gmail will treat them just like Google email.
There are quite a few things that can go wrong when you’re trying to add one of the “other” email providers to Gmail though. Let’s go through them one by one.
Your email provider might just not support the feature by default. For example, you need a tool called ProtonMail Bridge (bundled with Proton’s premium subscription) to access IMAP because Proton encrypts incoming and outgoing emails. POP3 support is just not available with Proton.
First, you have to manually enable IMAP and SMTP access within the email client interface that you’re using. Secondly, you’ll need to find the correct server, port, and security configurations for IMAP and SMTP access. And these settings can get really specific (and sometimes hard to find depending on the email provider).
Sometimes Gmail will reject these settings because the security standard the provider uses isn’t safe enough. In that case, you can add the server in question without any security settings enabled.
Other times it might tell you your username or password isn’t correct. Mostly because this password isn’t necessarily the password to your email account (although sometimes it is). Let me explain.
A lot of email providers want you to generate an app-specific password (some even charge for this feature, like this Fastmail service I occasionally use). It’s a safe way for these providers to give third parties access to their content. For example, this is how you manually add the IMAP configuration for an iCloud email.
UsernamePassword
Server name: imap.mail.me.com
SSL/TLS
Port: 993
The username is the iCloud email address. The password here is the app-specific password that you have to manually generate and link with your Apple ID. You might have to try both security settings to see which one works. The same goes for the SMTP server, except you have to try even more security options.
Now you know exactly how to add just about any email address to Gmail and manage all your mail in one place.

